Registration Fleet Batch is useful where a larger batch of registrations is required for a fleet delivery or similarly large batch of registrations. Each vehicle in the batch must be an identical model assembly (make, model, body, year of manufacture, seats & cylinders must all be the same). Each registration must also be the same CTP insurer. Individual transactions can vary the VIN, engine, colour & market value however.
To create a batch you first require a single transaction (either outstanding or completed). This transaction will form the basis of all other vehicles in the batch. The transaction should be identical to all other vehicles required in the batch (i.e.: vehicle type, customer, purpose of use etc).
•Create the first transaction. It does not have to be sent to Queensland Transport however you should make sure the model assembly has been done (see here on how to do this). Confirm that you have selected the correct details such as interim label vs. windscreen label, CTP insurer and class and purpose of use.
•Save or send the transaction.
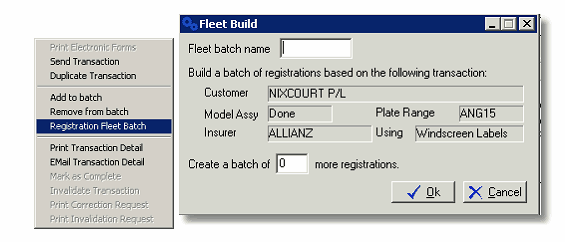
•From the DAIS Transaction window, right click on the transaction and select ‘Registration Fleet Batch’. The Fleet Build window (pictured above) will appear.
The Fleet Build window displays the name of the customer and whether or not the model assembly search has been done. If the model assembly has not been located the words NOT DONE will appear in red letters.
If you have not done a model assembly search you should cancel out of the Fleet Build window and look up the model assembly for this transaction (otherwise you will have to add the model assembly into each individual transaction after building the fleet!).
•Type in the name you want to give this batch (e.g. Energex) and the number of additional registrations that you require (remember you have already created one).
•Click Ok. The Registration Fleet Batch window (pictured below) will now appear.
Each vehicle in the batch is generated and displayed on a separate line. The plate, CTP and interim label (if applicable) will already be completed.
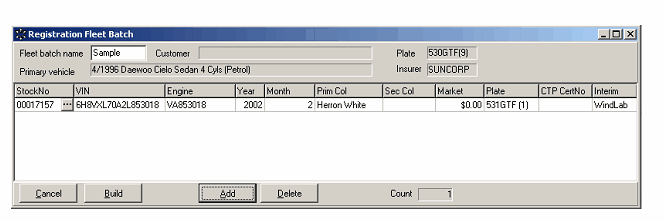
•Select the vehicle from your Dealership In-house system by entering the stock number into the Stock No field and pressing the Tab key on your keyboard. Dealerlogic will insert the remaining vehicle information from your mainframe file.
•Or: click the look up button (pictured 1. above) and select the vehicle from the main Stock Locate Window.
•Alternatively, you can manually enter the stock number, VIN & engine number and colour for each vehicle by tabbing through the fields and typing the data in yourself.
•If you have too many (or not enough) vehicles in your batch, use the Add or Delete buttons (pictured 2. above) to adjust the size of your batch.
•Once all vehicle details have been completed click Build (pictured 3. above).
•The vehicles in your batch will now be listed in the Outstanding Transactions Tab of the DAIS Transactions window, ready for sending or further editing if required. Once the batch has been built any alterations will need to be done individually.
Sending the batch
Each vehicle in the batch can be sent to Queensland Transport together as a batch or as individual transactions.
•From the DAIS Transactions window, right click on one of the transactions in the batch.
•Select Send Transaction or Send Batch from the menu.
Note: When Dealerlogic sends a batch of transactions it receives the result for each vehicle individually and attempts to print the paperwork for each vehicle before it receives the result for the next one. To avoid previewing each page prior to printing you can turn off the option to Preview Forms before Printing in the Dealerlogic Program Configuration (and turn it back on later if you wish).
•Select Admin from the Dealerlogic menu then Program Configuration and click on the Registration Defaults Tab. Un-tick ‘Preview Forms Before Printing’. To avoid printing too many or too few pages check that the correct number of copies is set to print.